Image Resolution
Resolution, also known as DPI (dots per inch) or PPI (pixels per inch), can be described as the number of dots that fit horizontally and vertically into a one-inch space. Generally, the more dots per inch, the more detail captured, and the sharper the resulting image. The problem with measuring resolution in this way is you have to also know the physical dimensions of the image. That is why we prefer to measure resolution in pixel dimensions.
You can always reduce resolution, but you can’t increase it without suffering a loss in quality.
You cannot change the resolution from very small to very large. This is going to be problematic. The resulting image will become pixilated and blurry. The best solution here is to start with the largest image you can.
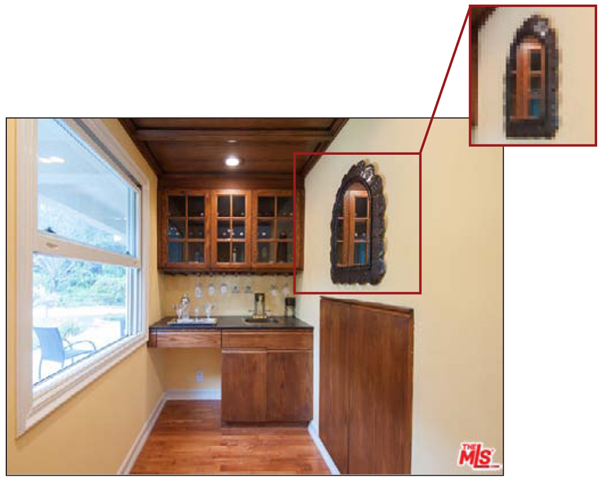
Low Resolution Image
This image was most likely pulled from the Internet. We can tell this by the logo watermark in the bottom right-hand corner and the image size. Any main image under 600 pixels is going to be low resolution.
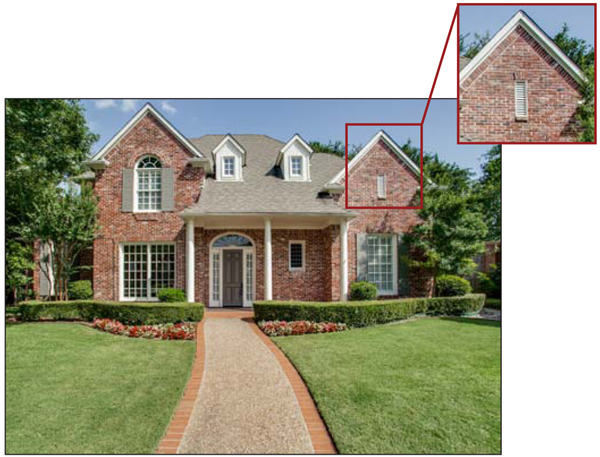
High Resolution Image
This image is high resolution. The file size is much larger (MB are larger than KB). The pixel dimensions of the image are large enough for this image to be placed anywhere in an ad.
Finding An Image Size
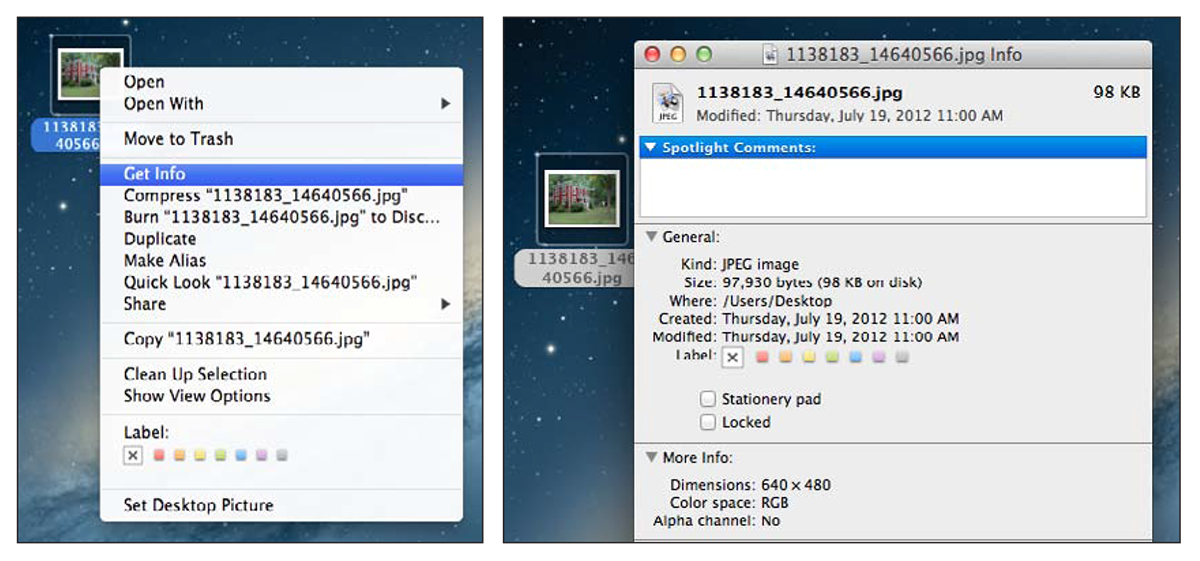
Finding an Image Size in Mac OS X
First, locate the image that you are trying to find the pixel dimensions of. If you have a two-button mouse, simply right-click on the image; a menu box should appear. If you do not have a two-button mouse, you can control-click on the image.
Once the menu has appeared, select “Get Info.” A new box will appear. Under the “More Info” section, you will see a line that says “Dimensions.” These are your pixel dimensions. Any image below 600 pixels wide is not recommended.
Finding an Image Size in Windows
First, locate the image that you are trying to find the pixel dimensions of. Right-click on the image so that a menu block appears. Scroll down to “Open with”, and then select “Paint.”
Once the image is opened in Paint, click on the “File” menu bar, and select “Properties.” The window below will open and show you the image’s pixel dimensions. Any image below 600 pixels wide is not recommended.
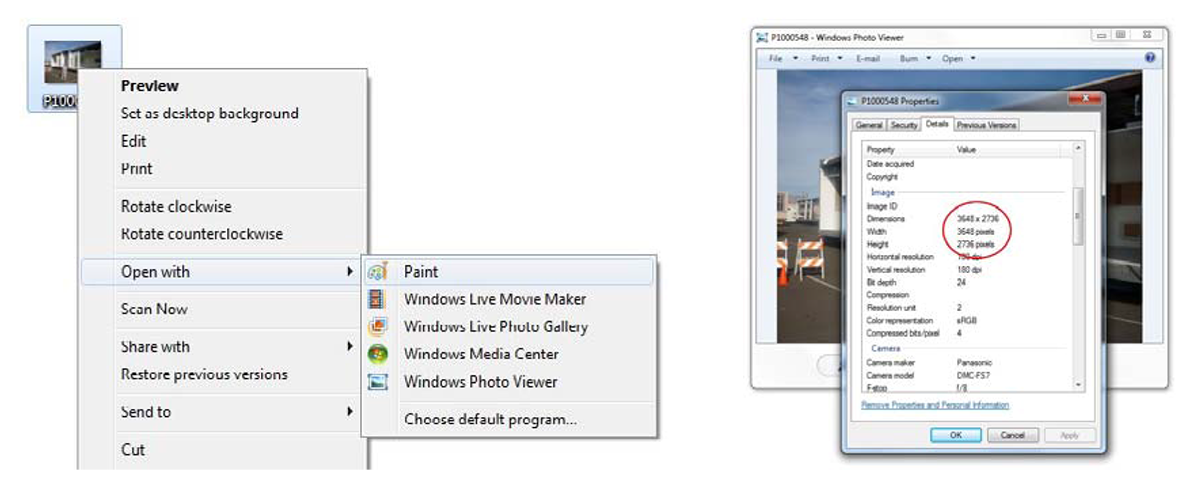
Image Size Reference Guide
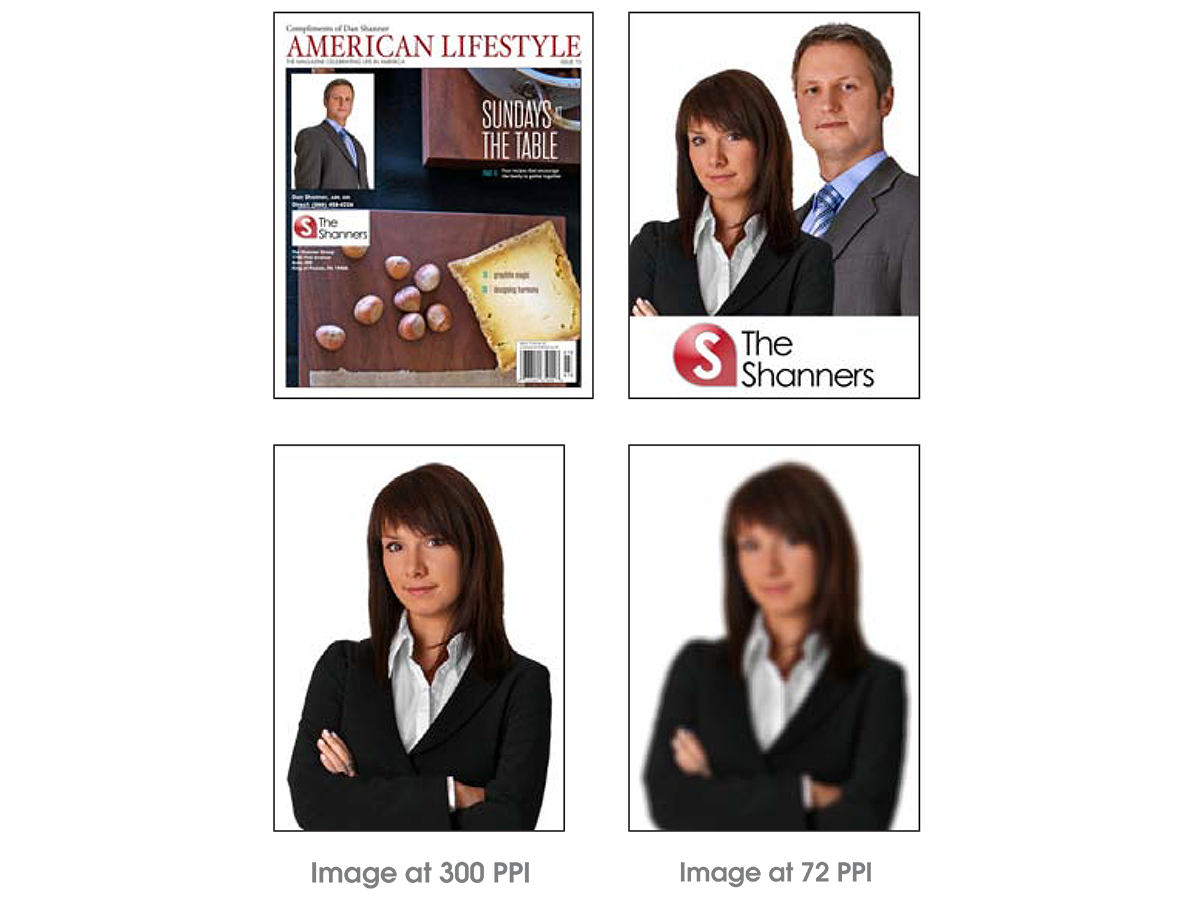
For best print quality, photos should be 300 PPI. Photos printing with a lower PPI can print grainy and blurry.
Main images will be the largest image on your ad. They will either be the full width of the ad or slightly smaller.
Inset images are smaller in size, but should still be high resolution. Any inset image sent to us will be sized according to the image size. We cannot make inset images larger if the file is low resolution.
Photos used on websites have different requirements than photos for print. Most photos taken from websites are 72 PPI (by print standards, this is low quality and unusable in most cases).
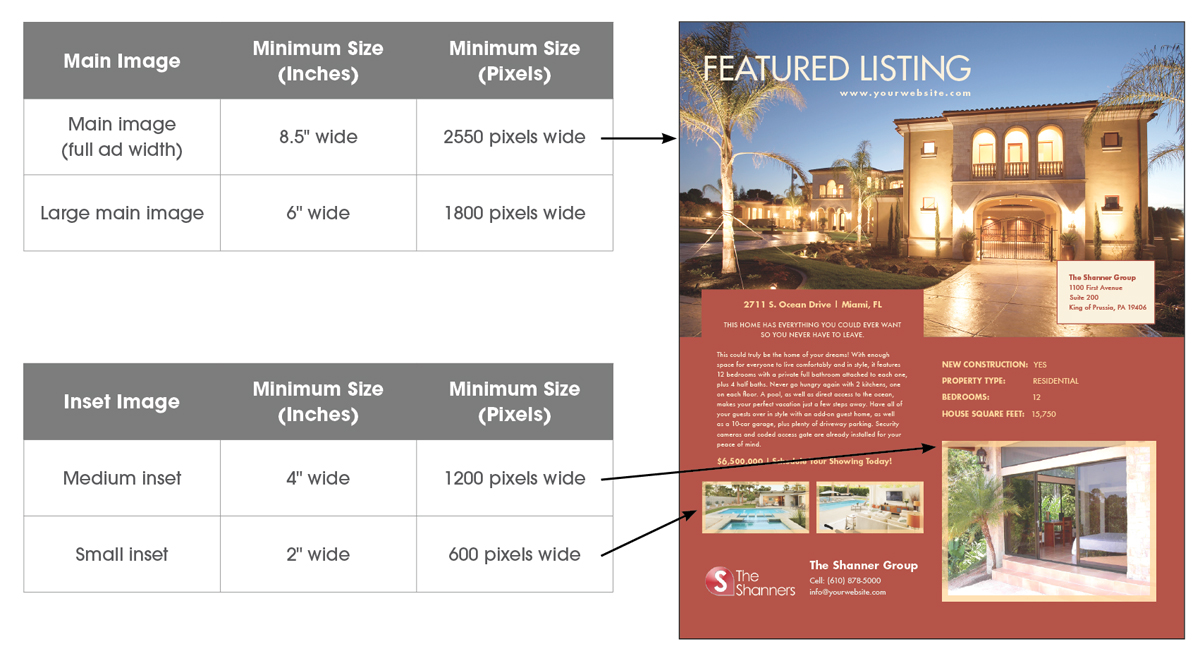
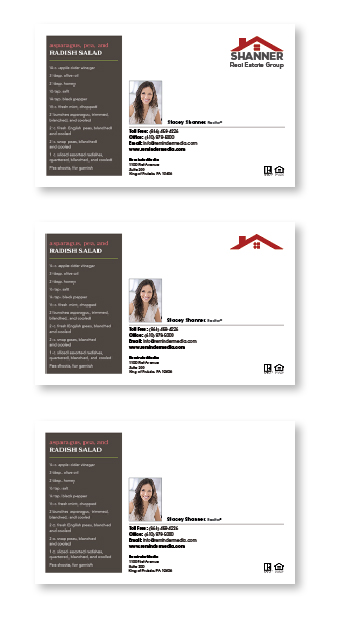
Photo Size Reference Guide
When you submit a photo to us, we will color
correct and touch up your photo for the best possible results. We look at each and every
photo submitted for use on your magazine.
This complimentary service allows you to look
your best.
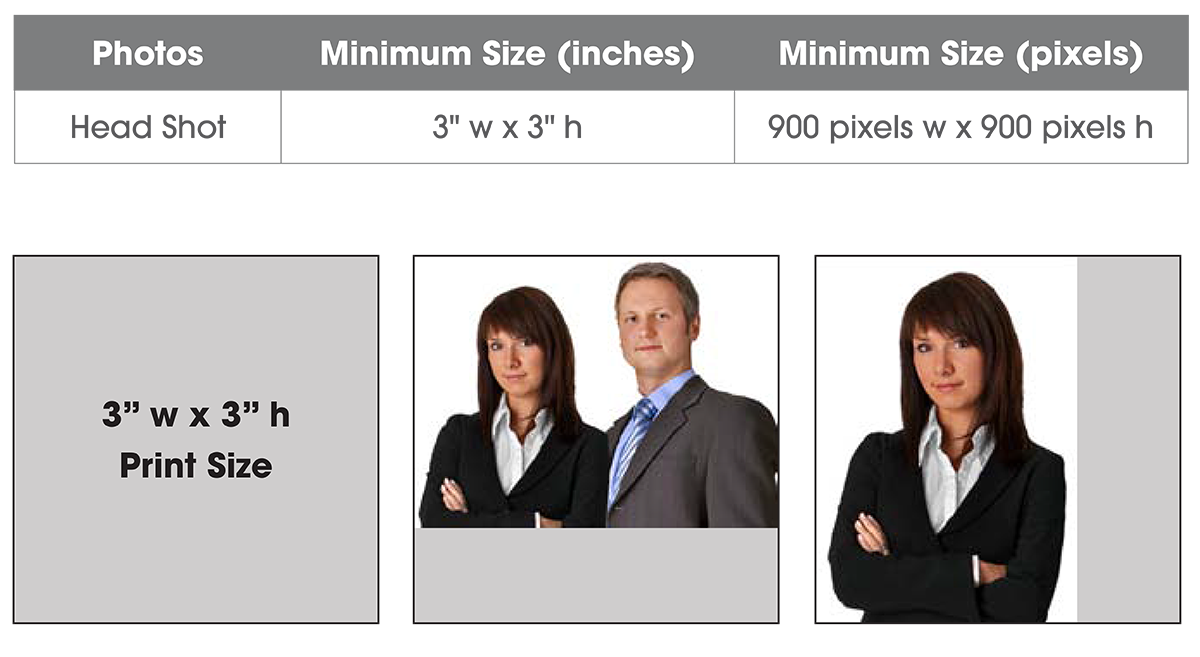
Head Shot
For best print quality, photos should be 300 PPI. Photos printing with a lower PPI can print grainy and blurry.
Photos used on websites have different requirements than photos for print. Most photos taken from websites are 72 PPI (by print standards, this is low quality and unusable in
most cases).
The photo must be 3 inches tall or 3 inches wide to print. This includes any other images attached to the photo (personal logos, etc.).
If the photo you submit is not 3″ x 3″ at 300 PPI, it will be uploaded to your account at a smaller size and print smaller.
If you have had your photo taken by a professional photographer, they will have the original image large enough to meet our requirements.
Logo Reference Guide
Logo Size
Vector formats (EPS) are preferred for all logos. Vector images are made up of many individual, scalable objects. These objects are defined by mathematical equations rather than pixels, so they always render at the highest quality, no matter what size.
![]()
Company logos appear on all template ads for customers in our Platinum program. Using a different logo, such as a personal logo, on template ads is available for a fee. The logo that appears on the contact block is the logo that will appear on all parts of the magazine.
Raster Logos
Raster images are made up of pixels in a grid. Pixels are picture elements—tiny dots of individual color that make up what you see on your screen. Raster images are difficult to use as logos because the background is a specific color and editing is needed to remove.

Vector Logos
Vector images allow for files—such as logos—to be scalable, to use a transparent background, and to be edited for individual elements, such as changing a color.


White Logos
When we receive an all white logo or a partially white logo, this can be problematic. The logo that is set for the MCB will print on the front cover, front inside cover, and tear out cards. Here is a visual of what will happen. We suggest putting a white box behind customer logos. This will ensure they print clearly on any cover. If a customer has multiple variations of their personal or company logo, it is best they send us all the variations so we can choose the best fit.
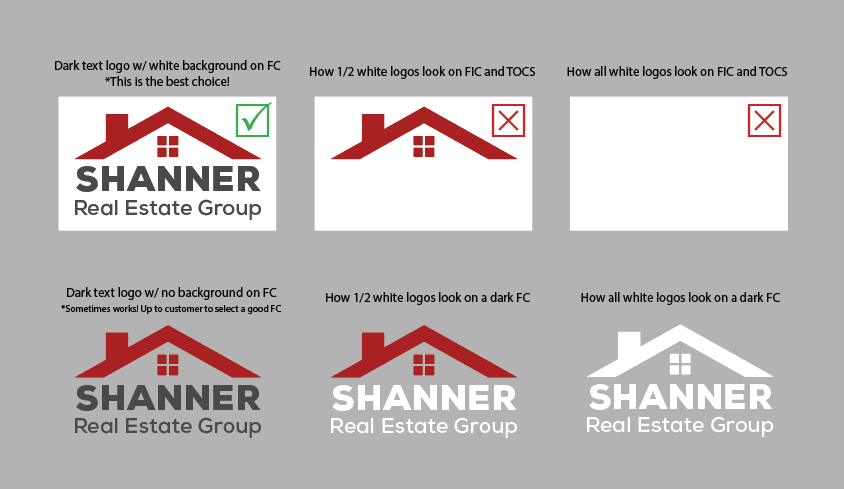
Examples of how dark text, 1/2 white text, or all white areas of logos look on TOCs. (FICs are the same case scenario)
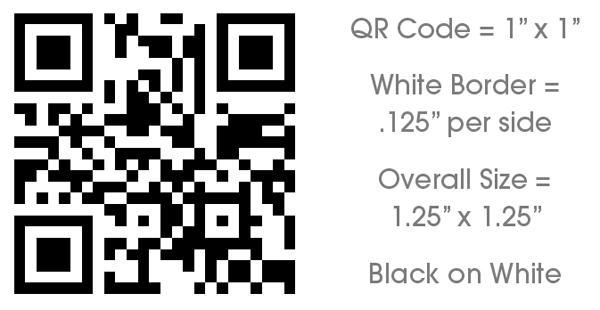
QR Code Reference Guide
A QR Code, or Quick Response Code, is similar to a bar code in that it contains information that can be scanned. There are multiple code generators available online, and many apps for phones and mobile devices that feature scanning capability.
If you choose to submit a QR Code to use with your magazine, it will be treated similar to your logo as variable information that automatically appears on specific areas of your magazine.
QR Codes placed as Secondary Logos
Print on Front Covers: QR Codes will appear on Professional Head Shot Cover 2. QR Codes will not appear on Compilation Article Cover 1.
Print on Front Inside Covers: QR Codes will appear on the Front Inside Cover, regardless of photo options (head shot or without a photo).
Print on Template Tear Out Cards: QR Codes will appear on template Tear Out Cards, unless they are submitted or are a custom Tear Out Card (not printing with variable information).
QR Codes with Custom Placements
QR Codes will not automatically print on submitted or custom created Back Outside Covers, Back Inside Covers, or Tear Out Cards, unless specified. Please note that depending on the placement request, custom placement fees may apply.
Things to consider and include in e-mail instructions when submitting your QR Code:
- Are we placing the submitted QR Code as a secondary logo?
- Are we custom placing the submitted QR Code on your Back Outside Cover, Back Inside Cover, or Tear Out Cards?
- Are we placing the submitted QR Code as both a secondary logo, and as a custom placement?
- Always send the actual file, from the code generator used, for the highest likelihood that it will scan properly.
ReminderMedia supports the use of standard QR Code images. No QR Code, submitted by customers or created by ReminderMedia, will be guaranteed to scan properly or to contain accurate data under any circumstance. QR Codes submitted by customers must follow our provided specifications for best accuracy. Ads and artwork submitted by customers should be tested by the customer prior to submission. ReminderMedia does not test submitted QR Codes for functionality or for accuracy. For these reasons, we can not guarantee that submitted QR Codes will print and scan as desired.